Virtual Environments
Data Science sometimes requires the ability to be able to handle the overlapping of package dependencies in python which can disturb your working environment. Sometimes you might be experimenting with an earlier version of a package (or library) which requires earlier versions of other packages which can cause conflict as legacy code may raise errors or warnigns accordingly due to conflict.
To circumvent these troubling issues that recur and to become good at the craft, let us take a look at using virtual environments. Virtual environments can be characterized as empty places that are isolated from the local source and a place you can install new packages (different versions or whatnot).
Virtual Environments with Anaconda
This part of the tutorial assumes that you have installed Anaconda as your primary installation and that you are using jupyter lab / notebook from it. Anaconda really simplifies package management.
To begin we will first create a virtual environment by relying on the conda command. Remember, you apply these steps either on the Anaconda Prompt or the console!
conda create -n myenv python=3.8
On the code above, myenv is the name of the virtual environment and python- is the version of python you want inside the virtual environment. Now we need to activate the created environment.
conda activate myenv
With this, you activate the virtual environment and any packets / dependencies that you wish can be installed in this virtual environment. If you wish to get out of the virtual environment just type the code below:
conda deactivate
You can also check all environments that you have already created in Anaconda by using:
conda env list
and if you would like to remove any of them, you can run the code:
conda env remove -n myenv
For adding new packages you use the following code below after activating your environment:
conda install -n myenv numpy
numpy is an example here. The syntax is
conda install -n [environment name] [package name]
Also for a specific package & version you use:
conda install -n myenv numpy==2.18.4
Great! You are done!
Adding the Virtual Environment in Jupyter Notebook/Lab
When you have created your virtual environment and installed Jupyter Lab or Notebook within the environment, at first Jupyter Notebook (being a standalone application) will not recognise the virtual environment. To set up the connection between the two, after activating your virtual environment run this code:
pip install --user ipykernel
This command has added a package called ipykernel. Then we can manually add the virtual environment in the Jupyter Notebook. We can use this code:
python -m ipykernel install --user --name=myenv
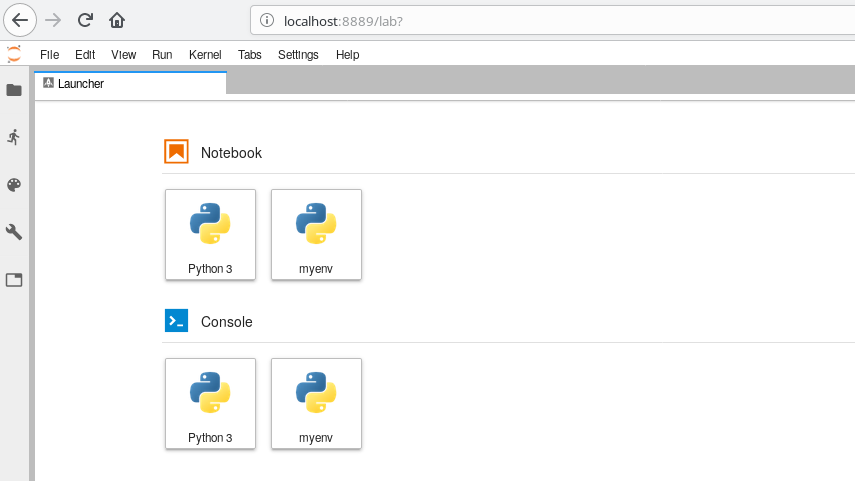
Where myenv is the name of the environment we have created. Now all is ready to be used! You can check in the Jupyter Lab interface or when you create a new Jupyter Notebook. You can see it as in below in the launcher now:
Lastly you can remove the virtual environment from Jupyter with:
jupyter kernelspec uninstall myenv